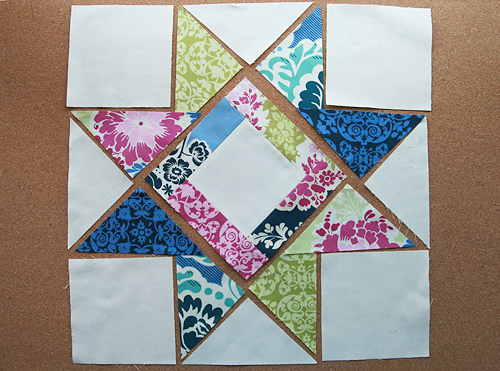
Solstice Stars Series : Another Star
We are now at week 3 of the Solstice Stars Series! Today we will be making a star with a very unassuming name, Another Star. This star is from Barbara Brackman’s book The Encyclopedia Of Pieced Quilt Patterns,page 347 and is attributed to Beth Gutcheon's Perfect Patchwork Primer.
When I first picked this star, I thought it looked simple enough. I didn't anticipate any trouble figuring out the pattern. Then I sat down on Saturday and looked a bit closer. Hmmm, look at those pieces around the center, they are all equal length. Which one to sew on first? Looked like a y-seam situation. I weighed the option and decided to allow a bit of cheating for that. (You'll see in the tutorial, hopefully the quilting purists aren't too upset with me!)
Then I continued on making the block according to my measurements and at the end, discovered by blocks was 1/4" to 1/2" too small. Back to the drawing board. After another failure, I turned to Photoshop to try figuring out the exact sizes that way.
That's where my "friend", Mr. 1/8th of an inch came in. Normally when I see a pattern that has measurements down to the 1/8", my eyes start to glaze over and I begin thinking of happy pursuits...like Downton Abbey. I don't know why, it's just another mark on the ruler. But if you want this block to be exact, you will need to use those 1/8" markings. Once I did, my block did indeed come out to measure 12.5" and look lovely. So on that note, let's get started!
Another Star Quilt Block Tutorial
Please note, all seams are 1/4″; Final block size 12.5″ unfinished
Step 1. Cut your fabric:
| Pattern Piece | Fabric | ||
| Center | Cut 1 | 4-1/8” x 4-1/8” | Background/White |
| Strips | Cut 3 | 5-1/8" x 1-1/2” | Print/Color |
| Short Strip A | Cut 1 | 4-1/8” x 1-1/2” | Print/Color |
| Short Strip B | Cut 1 | 1-1/2” x 1-1/2” | Same color as Short Strip A |
| Block Corners | Cut 4 | 4-1/2” x 4-1/2” | Background/White |
| Star Points | Cut 4 | 3-5/8” x 3-5/8” | Print/Color |
| HST Background | Cut 2 | 3-5/8” x 3-5/8” | Background/White |
Take all of your 3-5/8” x 3-5/8” squares for star points and the HST background and cut them diagonally into half square triangles.
Step 2. First we will sew the strips around the 4-1/8” x 4-1/8” center square. This is the part where I mentioned we were going to cheat a bit. Hopefully everyone is ok with that. :)
Layout your strips around your center square.
Take your shorter strip (Short Strip A, 4-1/8” x 1-1/2”) and sew to the bottom of the center square.
Continue to sew on the left and top strips, as you would a log cabin block.
For the final side, sew the 1-1/2" x 1-1/2" square to the end of the remaining side strip. Then sew the final side strip to the block, making sure you align the matching fabric seams.
At this point your center square should measure 6-1/8" x 6-1/8".
Step 3. Since I am a visual person, I find it helpful now to layout the rest of the block pieces before we continue.
Step 4. Let's sew together the top left and lower right points. Take your corner square. Gently iron press the block in half and then in half again the other direction, so you can see the center of the block. You could also make a mark using a water soluble pen.
Step 5. Place one of your half square triangles (HSTs) right side together with the corner square. Align your point to the center line you marked. Sew together. Make sure you are sewing along the long side of the HST, and not the short side which you are probably used to doing.
This is what your corner should now look like.
Step 6. Repeat with the other HST.
Repeat for the other corner. Your block layout should now look like this.
Step 7. Now we will make the top right and lower left corners. First repeat the previous steps and sew on your HSTs to the corner squares.
Step 8. Take your background HSTs and sew them to the sides of the star point section.
Your section should now look like this.
Step 9. Repeat for the other side. Your layout should now look like below.
Step 10. Almost done! All that is left is to sew on the corners of the block to the center. First sew the top left and lower right to the center.
Step 11. Next sew the remaining top right and lower left to the block. Square your block to 12.5" x 12.5" if necessary.
Congratulations! You are done!


