12 Gifts of Christmas Blog Hop - iPad Case Tutorial + Giveaway
Welcome to day 4 of the 12 Gifts of Christmas Blog Hop!

I hope everyone is having fun and getting some great ideas for holiday gifts this year. Today I am going to teach you how to make an iPad case. This tutorial can also be used to make a Kindle case (or Nook or any other tablet device), you will just need to measure your device and add about 1-1/4" to the width and length to figure out your cut fabric sizes.
For example, the iPad I used for this tutorial was 7.5" x 9.5". And my cut fabric pieces below are 8.75" x 10.75". So yep Kindle users, you will need to break out the calculator!
Another note, I have an iPad 1 which is a bit thicker than an iPad 2. So iPad 2 users, you may want to cut your pieces 1/4" (total) smaller to account for your sleeker design. :)
Let's get started.
iPad Case Tutorial
Supplies
9" zipper 2" of Velcro Fabric (see amounts below) Batting or Interfacing, depending on how poofy you want it (see amounts below)
Cut the following pieces:
Outer Case Fabric
Back - 8.75" x 10.75"
Front Top Portion - 3.75" x 8.75"
Front Bottom Portion - 7.25" x 8.75"
Pocket Lining Fabric
Cut 1 - 3.75" x 8.75"
Cut 1 - 7.25" x 8.75"
Cut 1 - 8.75" x 10.75"
Inner Lining Fabric
Cut 2 - 8.75" x 10.75"
Strap Fabric
Cut 2 - 3.5" x 3.5"
Zipper Ends Fabric
Cut 2 - 1.5" x 2.5"
Batting or Interfacing
Cut 2 - 8.75" x 10.75"
Cut 1 - 3.5" x 3.5"
(Adding a note: Lots of people are curious as to what the fabric is that I used for the cover. It is Ruby Star Rising Transistor Radios and I bought it from Alice at Fresh Modern Fabric.)
**Please note: 1/4" seam allowances for this project**
Assembly 1. Let's start with the strap. Place your 2 pieces of 3.5" x 3.5" fabrics right sides together. Place the batting or interfacing on the bottom of the fabric sandwich (see photo). Stitch together around 3 of the 4 sides.
Flip right side out and press.
2. Trim your zipper to 8.75".
3. Let's make your zipper ends. I learned this technique from the talented Anna of Noodlehead. Not to sound too much like Oprah, but learning to do these zipper ends was a life changing moment for me...well, as far as nice looking zippers are concerned! :)
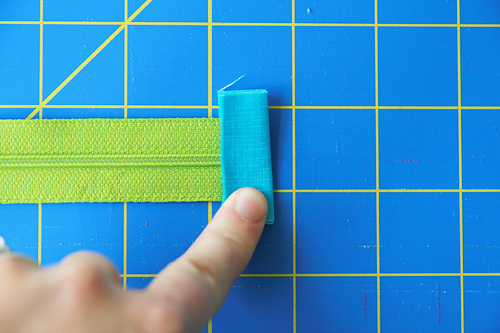
Take your zipper ends and press the sides towards the center as shown in the photo below.
4. Place the zipper ends on the each end of the zipper like this:
Top stitch the zipper ends to both ends of the zipper. This give it a nice finished look.
5. Now let's assemble the front outer portion of the case. Take your 3.75" x 8.75" piece of outer fabric and your 3.75" x 8.75" piece of pocket lining fabric. Place them right sides together and place the zipper in the middle of the fabric sandwich. See photo.
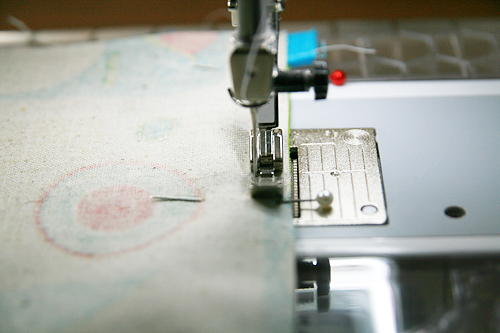
Pin in place.
6. Using your zipper foot, stitch down the fabric-zipper-fabric sandwich.
7. Open your sandwich and press.
8. Take your 7.25" x 8.75" piece of out fabric and your 7.25" x 8.75" piece of pocket lining fabric. We are going to repeat the previous step, but on the other side of the zipper. Place the fabric right sides together and place the zipper in the middle of the fabric sandwich. See photo.
Pin in place.
9. Using your zipper foot, stitch down the fabric-zipper-fabric sandwich.
10. Open your sandwich and press.
Front:
Back:
Top stitch down both sides of the zipper for a nice, finished look.
11. If you are like me, things may be *slightly* crooked now. Take this opportunity to trim your zipper front piece now to 8.75" x 10.75". Set this piece aside.
12. Let's make the outer back of the case. Take the strap you assembled in Step 1. Take the 8.75" x 10.75" outer back piece of fabric. Center the strap on the top as shown in the photo below (Unfinished ends together) with a slight bit of overhang.
13. Baste into place with less than a 1/4" seam allowance.
14. Let's finish the assembly of the outer portion of the case. Make a fabric sandwich as follows: 8.75" x 10.75" outer back right side up - 8.75" x 10.75" assembled zipper front right side down - 8.75" x 10.75" pocket lining piece right side down
15. Stitch around sides and bottom, leaving the top open. Flip right side out and press.
16. Now let's assemble the inner lining. Place the 8.75" x 10.75" inner lining pieces right sides together. Place an 8.75" x 10.75" piece of batting or interfacing on the top and bottom of the fabric sandwich.
Stitch around sides and bottom, leaving the top open. Do not flip right side out.
17. Time to put it together! With the exterior of the case right side out and the lining of the case wrong side out, place the exterior inside the lining and pin the tops together. Make sure the strap is tucked in.
18. Stitch around the top of the case, leaving about 4" open to flip the case right side out.
19. Flip the case right side out and tuck the inner lining into the outer shell. Press. Top stitch around the top to close the opening and give the case a nice, finished look.
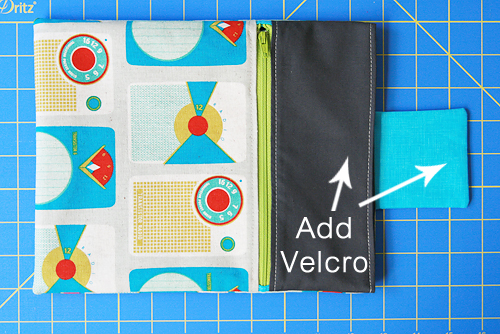
20. Add velcro to the back of the strap and the case. Stitch in place.
Now for the giveaway!
Enter to win a $25 gift certificate to Fat Quarter Shop by leaving one comment on this post. I will choose one winner via Random.org on Oct. 26th.
Also, please visit Ellison Lane Quilts and leave one comment on her tutorial to be entered to win the GRAND PRIZE of a $250 gift certificate to Fabricworm!
And just for stopping by, you can take advantage of a generous 15% off discount at Fabricworm with the coupon code fw12days through the end of the blog hop.
Don't forget to keep checking out the tutorials over the next week and a half!
Friday, October 14- Jennifer @
Saturday, October 15- Ayumi/
Sunday, October 16- Amy/
Monday, October 17- Faith/
Tuesday, October 18- Penny/
Wednesday, October 19- Kati/
Thursday, October 20- Lee/
Friday, October 21- Elizabeth/
Saturday, October 22- Melanie/
Sunday, October 23- Lindsay/
Monday, October 24- Amanda/
Tuesday, October 25-Vanessa/
******** UPDATE ******** I'm closing comments and picking a winner for the Fat Quarter Shop gift certificate! If you have any questions or comments in the future on this tutorial, feel free to email me. My email address is at the top of this page by my photo. Thanks everyone, be right back with the winner! ************************ The lucky winner is Mary on Lake Pulaski. Mary said "Great tutorial! I’ll be making one tomorrow! Thank you."
Congratulations Mary! I will send your email address off to Jennifer who is coordinating the prizes!


