Glorious Autumn: Autumn Star
Welcome to my stop of Quilting Gallery's Glorious Autumn Block Hop!
Today I'm very excited to be sharing a new quilt block tutorial with you, the Autumn Star. The Autumn Star is a 12.5" x 12.5" (unfinished) quilt square. The background consists of a variety of neutrals, starting from light at the top of the block and working their way darker as you go to the bottom of the block. (Scroll to the bottom of the post to see what I made with my star.) Let's get started!
Autumn Star Quilt Block Tutorial
Please note, all seams are 1/4″; Final block size 12.5″ unfinished
Step 1: Cut your fabric. I decided to make my quilt block scrappy which meant cutting extra print fabrics so none of my HST (half square triangles) per size were the same. You don't have to do this, I just liked the look. The below chart shows the minimum requirements for cut fabric. If you'd like your star to be extra scrappy like mine, you will need to cut extra prints per size.
Background Tan/Neutral 1 :
Cut (1) 4.5" x 4.5"
Cut (2) 3.5" x 3.5"
Background Tan/Neutral 2:
Cut (1) 4.5" x 4.5"
Background Tan/Neutral 3:
Cut (1) 4.5" x 4.5"
Background Tan/Neutral 4:
Cut (1) 4.5" x 4.5"
Cut (2) 3.5" x 3.5"
Background Cream/Text Print:
Cut (4) 2.5" x 2.5"
Cut (4) 4.25" x 4.25"
Center Brown/Crosshatch:
Cut (1) 2.5" x 2.5"
Outer Star Points Various Prints:
Cut (4) 4.5" x 4.5"
Inner Star Points Various Prints:
Cut (4) 4.25" x 4.25"
Step 2: We will first assemble the inner star. Take your (4) 4.25" x 4.25" inner star point fabric and your (4) 4.25" x 4.25" cream/text print background fabric and cut them diagonally into HSTs. Pair up 1 of each print HST to 1 of the cream/text HSTs.
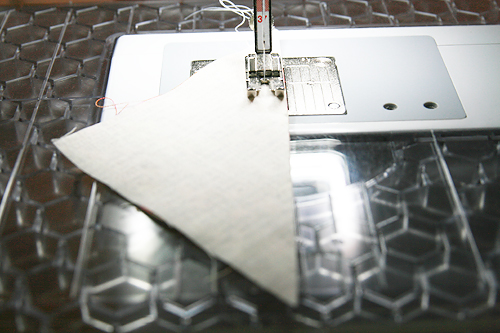
Step 3: Sew, right sides together, down the long end of the HSTs.
You should now have 8 squares.
Step 4: Trim your (8) squares to 3.5" x 3.5".
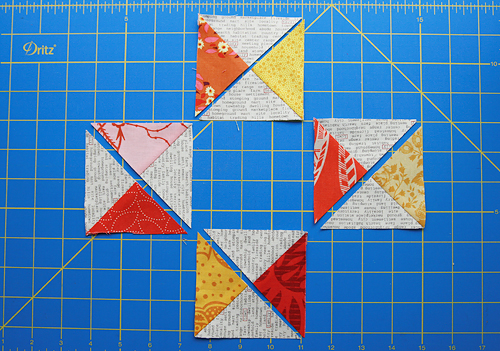
Step 5: Using your quilting ruler, cut your squares diagonally in the opposite direction as your sewn seam, as shown below. You will now have (16) HSTs. Set aside 8 of these to use, and 8 for the scrap bin.
Step 6: Because I wanted a scrappy look, I decided to lay out my inner star points until I was pleased with the colors.
Once you are happy with the look, sew each of your HSTs together to form hourglasses as shown below.
Step 7: Trim your blocks to 2.5" x 2.5".
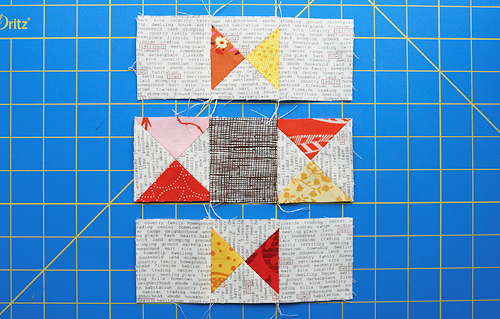
Step 8: Take your (4) 2.5" x 2.5" Cream/Text Print squares, your 2.5" x 2.5" Center Square and your (4) Hourglass squares and lay them out like a 9 patch, as shown below.
Step 9: Sew the squares together into rows.
Step 10: Sew the rows together to form a 6.5" x 6.5" square.
Step 11: Now we will make the star points for the outer star. Take your (4) 4.5" x 4.5" outer star point fabrics and cut them diagonally into HSTs.
Take each of your 4.5" x 4.5" tan background fabrics (you should have 1 of each of your shades of tan) and cut them diagonally into HSTs too.
Again, I wanted my block to be scrappy so I laid out my fabrics until they were just right.
If you are doing the varied shades of tan like me, keep in mind that your top row is your lightest fabric and work your way down to the bottom row, your darkest fabric.
Step 12: Sew each of your print HSTs to your tan HSTs, resulting in 8 squares.
Step 13: Trim your squares to 3.5" x 3.5".
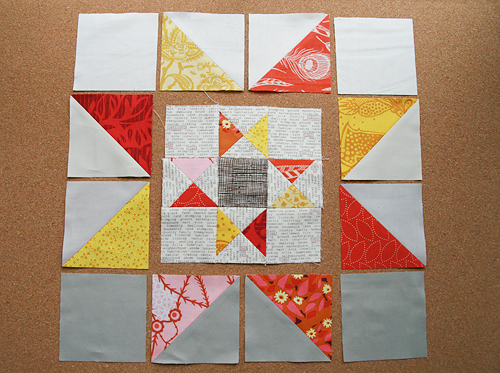
Step 14: Layout your block using your sewn components and the remaining 3.5" x 3.5" tan background squares.
Step 15: Sew the top 4 squares together into a row. Sew the bottom 4 square together into a row. Sew the side 2 squares together into columns.
Step 16: Sew the left and right columns to the inner star you made in the first half of the tutorial.
Step 17: Sew your top and bottom rows to the middle rows.
You're done! Enjoy your beautiful star!
I decided to add a bit of sashing to my block and turn it into a Fall pillow for my couch.
Autumn Star Pillow by Faith of Fresh Lemons Quilts
I free motion quilted the star portion (not the dark sashing) it in a nice meandering design. The backing is a great text print from Sweetwater's Mama Said Sew line.
Autumn Star Pillow by Faith of Fresh Lemons Quilts
I hope you enjoy making your very own Autumn Star. Be sure to check out Quilting Gallery's Glorious Autumn page for more tutorials, coupons and giveaways!


